
Chocolate cake… My very first love, and my sure fire kryptonite. I will NEVER say “no” to a piece…
Here is my take on a chocolate cake recipe that will surely prove to be simple to make, is moist, FLAVORFUL (some have compared this to a rich chocolate brownie(!!)), and holds its texture! I mean, this is a cake you can likely throw across the room and it’ll STILL maintain it’s perfect shape and moist texture! I kid, I kid…. I’d never advocate cake assault. This isn’t an episode of “The Real Housewives of New Jersey”… you guys remember that episode? …. talk about a stake to my heart!
Anyway, I hope you all enjoy this recipe, and if you try it, let me know what you think in the comments section below! Happy baking!
Storage Instructions: I generally make my cake layers a few days in advance, but if you are planning to bake your layers and decorate in the same day, I would just be sure to give yourself enough time for the cake layers to FULLY cool. I have countless stories of trying to decorate my cakes with even slightly warm layers, and the results turned out to be a slippery “Leaning Tower of Pisa” disaster every time.
Once I take my cake layers out of the oven, here is my process:
I let the cake layers cool in their cake pans for approximately 20 min, then pop them out of their pans and onto a cooling rack for an additional 10-15 minutes or so. If you spray the pans well enough with a non-stick spray prior to baking, they should pop out with a gentle tap on the bottom of the pan; however, you may experience a stubborn layer here and there, so you may need to slide a butter knife around the edge of the cake layer to help separate the layer from the pan. I’ll then double wrap each layer with Glad Press’n Seal, and place them in a 1 pound Ziploc bag (I can generally fit 2 layers per bag). As you seal the Ziploc bag, try to remove as much air as possible from the bag since the goal is to try to keep the layers as fresh and moist as possible.
From here you can place in your freezer for up to 2 weeks, but again, if you need to decorate your cake the same day, just pop into your fridge for a couple hours to ensure your layers are as cool as can be! NOTE: if you do freeze your cake layers, be sure to take them out of the freezer about 20-30 minute in advance to thaw a bit, and bring them back to a cooler room temperature.
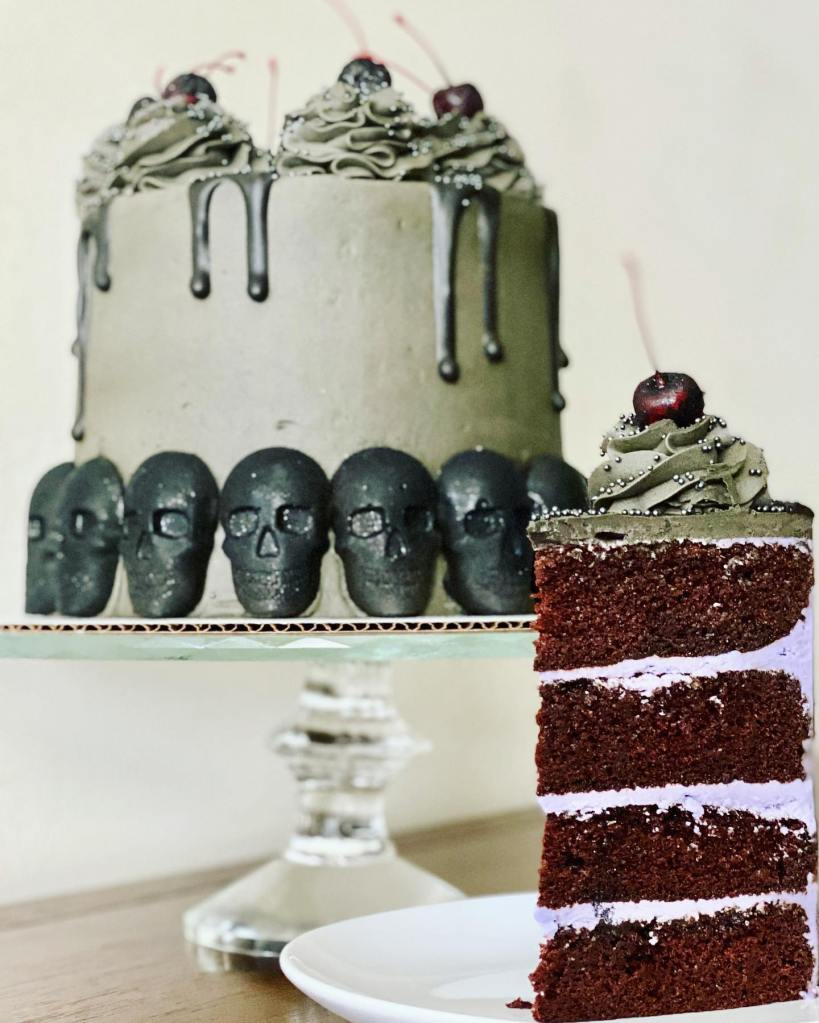
THE BEST (Very Chocolate) Chocolate Cake Recipe
Total Time: 40-50 minutes
Servings: 1 7-8 inch, 4 layer cake
Keywords: Chocolate cake, chocolate, cakes, cake, best chocolate cake
Ingredients
- 2 cups all-purpose flour
- 2 1/4 cup sugar
- 1 cup cocoa powder
- 1 teaspoon baking powder
- 2 teaspoons baking soda
- 1 teaspoon salt
- 1 1/4 cup buttermilk, shaken
- 1/2 cup vegetable oil
- 2 eggs
- 2 teaspoons vanilla extract
- 1 1/4 cup brewed hot coffee
Instructions
- Preheat the oven to 350 degrees F. Spay 4, 7 or 8 inch round baking pans with non-stick spray (I use PAM). Make sure to get a good coating on the bottom and around the sides. Line all four pans with parchment rounds cut the same size as the pans (7 or 8 inch).
- Sift the flour, sugar, cocoa, baking soda, baking powder, and salt into the bowl of a standing mixer fitted with a paddle attachment and mix on low speed until combined.
- In another bowl, combine the buttermilk, oil, eggs, and vanilla. With the mixer on low speed, slowly add the wet ingredients to the dry. With mixer still on low, add the coffee and stir just to combine, scraping the bottom of the bowl with a rubber spatula.
- NOTE: Make sure to temper the cake batter with the coffee, by adding a little bit of coffee in at first and when you start mixing it in. Adding in all the hot coffee at once may result in cooking your eggs! The goal here is to slowly bring up the temperature of the eggs without scrambling them.
- Divide and pour the batter evenly into the prepared pans and bake for 35-40 minutes, until a toothpick comes out clean. The cakes will start to pull away from the sides of the baking pan.
- Once your cakes have completely cooled, and are cold to the touch, use a cake leveler or serrated knife to level the tops of the layers, then frost away!
- NOTE: Be sure to review my storage instructions above for more information on my process!
Recipe Notes, Tips, and Tricks:
This recipe makes 1 7-8 inch, 4 layer cake. If you want to make a taller cake, you can also baking this recipe in 6 inch pans!
This recipe feeds about 25 people, possibly more depending on how you are cutting the cake.
To cut out my parchment rounds, I place a cake pan on a piece of parchment paper and outline the exact circle size I need using a food marker, then cut out.
When baking my cake layers, I set a timer about half way (20 minutes) to the cooking time. Once the timer goes off, I turn my cakes 180 degrees, then set a timer for the remaining time (first set to 15 minutes, and if toothpick still comes out wet, set a new timer for 3 minutes and check again. Keep setting 3 minute timer intervals until the toothpick comes out clean).
Rotating your cake layers half way helps to ensure even baking all around.
I usually bake my cake layers the day before so I’m not rushing to bake and decorate in the same day. It also let’s the cake fully cool overnight and makes the decorating part that much easier. If you’re able to, and have the time, I highly recommend baking your layers in advance! Remember, this cake recipe can be made up to 2 weeks in advance if stored properly, and per the above instructions!
Suggested Tools: KitchenAid mixer with paddle attachment, spatula
